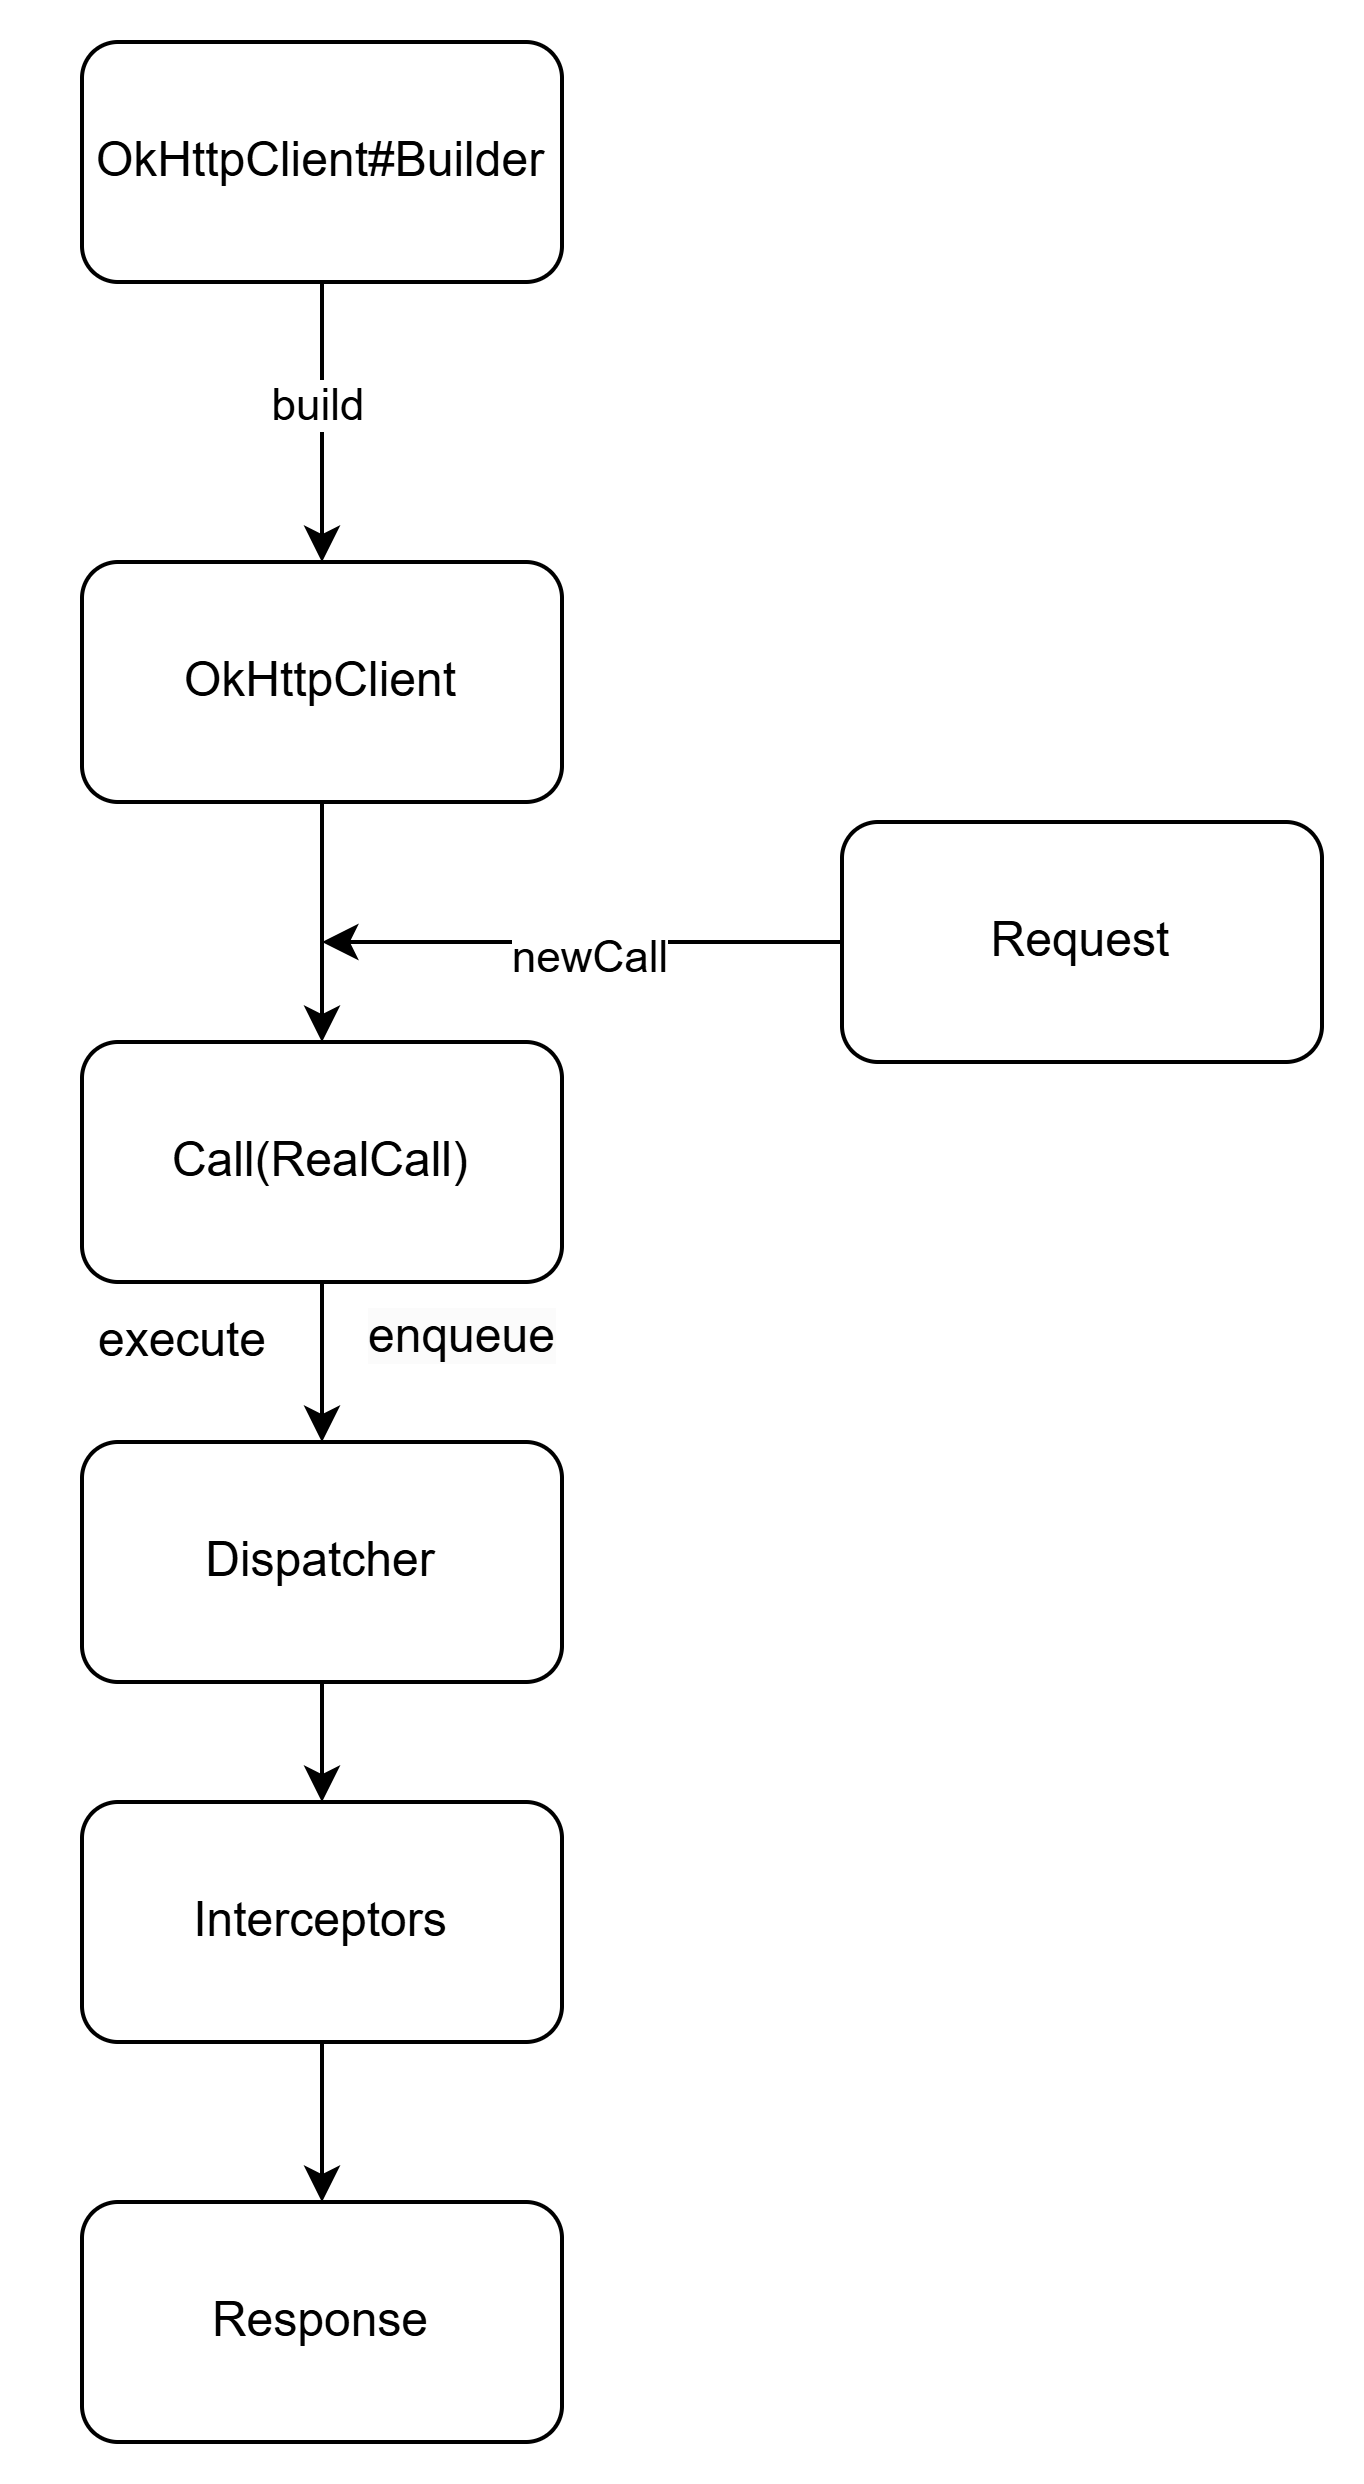
使用方法 分别创建一个OkHttpClient对象,一个Request对象,然后利用他们创建一个Call对象,最后调用同步请求execute()方法或者异步请求enqueue()方法来拿到Response。
1
2
3
4
5
6
7
8
9
10
11
12
13
14
15
16
17
18
19
20
21
22
private final OkHttpClient client = new OkHttpClient ();Request request = new Request .Builder().url("https://github.com/" ) .build(); Response response = client.newCall(request).execute();client.newCall(request).enqueue(new Callback () { @Override public void onFailure (@NotNull Call call, @NotNull IOException e) { } @Override public void onResponse (@NotNull Call call, @NotNull Response response) throws IOException { } });
基本对象介绍 OkHttpClient 一个请求的配置类,采用了建造者模式 ,方便用户配置一些请求参数,如配置callTimeout,cookie,interceptor等等。
1
2
3
4
5
6
7
8
9
10
11
12
13
14
15
16
17
18
19
20
21
22
23
24
25
26
27
28
29
30
31
32
33
34
35
36
37
38
39
40
41
42
43
44
45
46
47
48
49
50
51
52
53
54
55
56
57
58
59
60
open class OkHttpClient internal constructor (builder: Builder) : Cloneable, Call.Factory, WebSocket.Factory {constructor () : this (Builder())class Builder constructor () {internal var dispatcher: Dispatcher = Dispatcher()internal var connectionPool: ConnectionPool = ConnectionPool()internal val interceptors: MutableList<Interceptor> = mutableListOf()internal val networkInterceptors: MutableList<Interceptor> = mutableListOf()internal var eventListenerFactory: EventListener.Factory = EventListener.NONE.asFactory()internal var retryOnConnectionFailure = true internal var authenticator: Authenticator = Authenticator.NONEinternal var followRedirects = true internal var followSslRedirects = true internal var cookieJar: CookieJar = CookieJar.NO_COOKIESinternal var cache: Cache? = null internal var dns: Dns = Dns.SYSTEMinternal var proxy: Proxy? = null internal var proxySelector: ProxySelector? = null internal var proxyAuthenticator: Authenticator = Authenticator.NONEinternal var socketFactory: SocketFactory = SocketFactory.getDefault()internal var sslSocketFactoryOrNull: SSLSocketFactory? = null internal var x509TrustManagerOrNull: X509TrustManager? = null internal var connectionSpecs: List<ConnectionSpec> = DEFAULT_CONNECTION_SPECSinternal var protocols: List<Protocol> = DEFAULT_PROTOCOLSinternal var hostnameVerifier: HostnameVerifier = OkHostnameVerifierinternal var certificatePinner: CertificatePinner = CertificatePinner.DEFAULTinternal var certificateChainCleaner: CertificateChainCleaner? = null internal var callTimeout = 0 internal var connectTimeout = 10_000 internal var readTimeout = 10_000 internal var writeTimeout = 10_000 internal var pingInterval = 0 internal var minWebSocketMessageToCompress = RealWebSocket.DEFAULT_MINIMUM_DEFLATE_SIZEinternal var routeDatabase: RouteDatabase? = null ···省略代码···
Request 同样是请求参数的配置类,也同样采用了建造者模式 ,只有四个参数,分别是请求URL、请求方法、请求头、请求体。
1
2
3
4
5
6
7
8
9
10
11
12
13
14
15
16
17
18
19
20
class Request internal constructor ( @get:JvmName ("url" ) val url: HttpUrl, @get:JvmName ("method" ) val method: String, @get:JvmName ("headers" ) val headers: Headers, @get:JvmName ("body" ) val body: RequestBody?, internal val tags: Map<Class<*>, Any> ) { open class Builder { internal var url: HttpUrl? = null internal var method: String internal var headers: Headers.Builder internal var body: RequestBody? = null ···省略代码··· } }
Call 请求调用接口,表示这个请求已经准备好可以执行 ,也可以取消 ,只能执行一次 。
1
2
3
4
5
6
7
8
9
10
11
12
13
14
15
16
17
18
19
20
21
22
23
24
25
26
27
28
29
30
31
32
33
34
35
36
37
38
interface Call : Cloneable { fun request () @Throws(IOException::class) fun execute () fun enqueue (responseCallback: Callback ) fun cancel () fun isExecuted () Boolean fun isCanceled () Boolean fun timeout () public override fun clone () fun interface Factory { fun newCall (request: Request ) } }
RealCall 在 OkHttpClient 中,利用 newCall 方法来创建一个 Call 对象,但从源码中可以看出,newCall 方法返回的是一个 RealCall 对象。
1
2
3
4
5
6
7
8
9
10
11
@Override public void enqueue (Callback responseCallback) { synchronized (this ) { if (executed) throw new IllegalStateException ("Already Executed" ); executed = true ; } captureCallStackTrace(); eventListener.callStart(this ); client.dispatcher().enqueue(new AsyncCall (responseCallback)); }
synchronized (this) 确保每个call只能被执行一次不能重复执行,如果想要完全相同的call,可以进行克隆
1
2
3
4
@SuppressWarnings("CloneDoesntCallSuperClone") @Override public RealCall clone () { return RealCall.newRealCall(client, originalRequest, forWebSocket); }
利用dispatcher调度器,来进行实际的执行client.dispatcher().enqueue(new AsyncCall(responseCallback))
1
2
override fun newCall (request: Request ) RealCall(this , request, forWebSocket = false )
RealCall是Call接口的具体实现类,是应用端与网络层的连接桥,展示应用端原始的请求与连接数据,以及网络层返回的response及其它数据流。 通过使用方法也可知,创建RealCall对象后,就要调用同步或异步请求方法,所以它里面还包含同步请求 execute() 与异步请求 enqueue()方法。
AsyncCall 异步请求调用,是RealCall的一个内部类,就是一个Runnable,被调度器中的线程池所执行。
1
2
3
4
5
6
7
8
9
10
11
12
13
14
15
16
17
18
19
20
21
22
23
24
25
26
27
28
29
30
31
32
33
34
35
36
37
38
39
40
41
42
43
44
45
46
47
48
49
50
51
52
53
54
55
56
57
58
59
60
61
62
63
64
65
66
67
68
69
70
71
inner class AsyncCall ( private val responseCallback: Callback ) : Runnable { @Volatile var callsPerHost = AtomicInteger(0 ) private set fun reuseCallsPerHostFrom (other: AsyncCall ) this .callsPerHost = other.callsPerHost } ···省略代码··· fun executeOn (executorService: ExecutorService ) client.dispatcher.assertThreadDoesntHoldLock() var success = false try { executorService.execute(this ) success = true } catch (e: RejectedExecutionException) { val ioException = InterruptedIOException("executor rejected" ) ioException.initCause(e) noMoreExchanges(ioException) responseCallback.onFailure(this @RealCall , ioException) } finally { if (!success) { client.dispatcher.finished(this ) } } } override fun run () threadName("OkHttp ${redactedUrl()} " ) { var signalledCallback = false timeout.enter() try { val response = getResponseWithInterceptorChain() signalledCallback = true responseCallback.onResponse(this @RealCall , response) } catch (e: IOException) { if (signalledCallback) { Platform.get ().log("Callback failure for ${toLoggableString()} " , Platform.INFO, e) } else { responseCallback.onFailure(this @RealCall , e) } } catch (t: Throwable) { cancel() if (!signalledCallback) { val canceledException = IOException("canceled due to $t " ) canceledException.addSuppressed(t) responseCallback.onFailure(this @RealCall , canceledException) } throw t } finally { client.dispatcher.finished(this ) } } } }
Dispatcher 调度器,用来调度Call对象,同时包含线程池与异步请求队列,用来存放与执行AsyncCall对象。
1
2
3
4
5
6
7
8
9
10
11
12
13
14
15
16
17
18
19
20
21
22
23
24
class Dispatcher constructor () { @get:Synchronized @get:JvmName ("executorService" ) val executorService: ExecutorService get () { if (executorServiceOrNull == null ) { executorServiceOrNull = ThreadPoolExecutor(0 , Int .MAX_VALUE, 60 , TimeUnit.SECONDS, SynchronousQueue(), threadFactory("$okHttpName Dispatcher" , false )) } return executorServiceOrNull!! } @get:Synchronized private val readyAsyncCalls = ArrayDeque<AsyncCall>() private val runningAsyncCalls = ArrayDeque<AsyncCall>() private val runningSyncCalls = ArrayDeque<RealCall>() ···省略代码··· }
1 2 3 4 5 6 7 8 9 10 11 12 13 14 15 16 synchronized void enqueue (AsyncCall call) { if (runningAsyncCalls.size() < maxRequests && runningCallsForHost(call) < maxRequestsPerHost) { runningAsyncCalls.add(call); executorService().execute(call); } else { readyAsyncCalls.add(call); } }
Dispatcher将call加入到队列中,然后通过线程池来执行call。
1 2 3 4 5 6 7 8 9 10 11 12 13 14 15 16 17 18 private int maxRequests = 64 ;private int maxRequestsPerHost = 5 ;private final Deque<AsyncCall> readyAsyncCalls = new ArrayDeque <>();private final Deque<AsyncCall> runningAsyncCalls = new ArrayDeque <>();
executorService() 这个方法创建了一个线程池
1
2
3
4
5
6
7
8
9
10
11
12
13
14
public synchronized ExecutorService executorService () { if (executorService == null ) { executorService = new ThreadPoolExecutor ( 0 , Integer.MAX_VALUE, 60 , TimeUnit.SECONDS, new SynchronousQueue <Runnable>(), Util.threadFactory("OkHttp Dispatcher" ,false ) ); } return executorService; }
总结
对象
作用
Call请求调用接口,表示这个请求已经准备好可以执行,也可以被取消,只能执行一次。
RealCallCall接口的具体实现类,是应用与网络层之间的连接桥,包含OkHttpClient与Request信息。
AsyncCall异步请求调用,其实就是个Runnable,会被放到线程池中进行处理。
Dispatcher调度器,用来调度Call对象,同时包含线程池与异步请求队列,用来存放与执行AsyncCall对象。
Request请求类,包含url、method、headers、body。
Response网络层返回的响应数据。
Callback响应回调函数接口,包含onFailure、onResponse 两个方法。
流程分析 OkHttp请求过程中最少只需要接触OkHttpClient、Request、Call、Response,但是框架内部进行大量的逻辑处理。
所有的逻辑大部分集中在拦截器中,但是在进入拦截器之前还需要依靠分发器来调配请求任务。
分发器:内部维护队列线程池内,完成请求调配
拦截器:完成整个请求过程。
同步请求 分发器只记录请求,用于判断ldleRunnable是否需要执行
1 client.newCall(request).execute();
newCall方法就是创建一个RealCall对象,然后执行其execute()方法。
RealCall.kt
1
2
3
4
5
6
7
8
9
10
11
12
13
14
15
16
17
18
override fun execute () check(executed.compareAndSet(false , true )) { "Already Executed" } timeout.enter() callStart() try { client.dispatcher.executed(this ) return getResponseWithInterceptorChain() } finally { client.dispatcher.finished(this ) } }
调用调度器executed方法,就是将当前的RealCall对象加入到runningSyncCalls队列中,然后调用getResponseWithInterceptorChain方法拿到response。
真正执行请求的是getResponseWithInterceptorChain(); 然后通过回调将Response返回给用户。
值得注意的finally 执行了client.dispatcher().finished(this); 通过调度器移除队列,并且判断是否存在等待队列,如果存在,检查执行队列是否达到最大值,如果没有将等待队列变为执行队列。这样也就确保了等待队列被执行。
异步请求
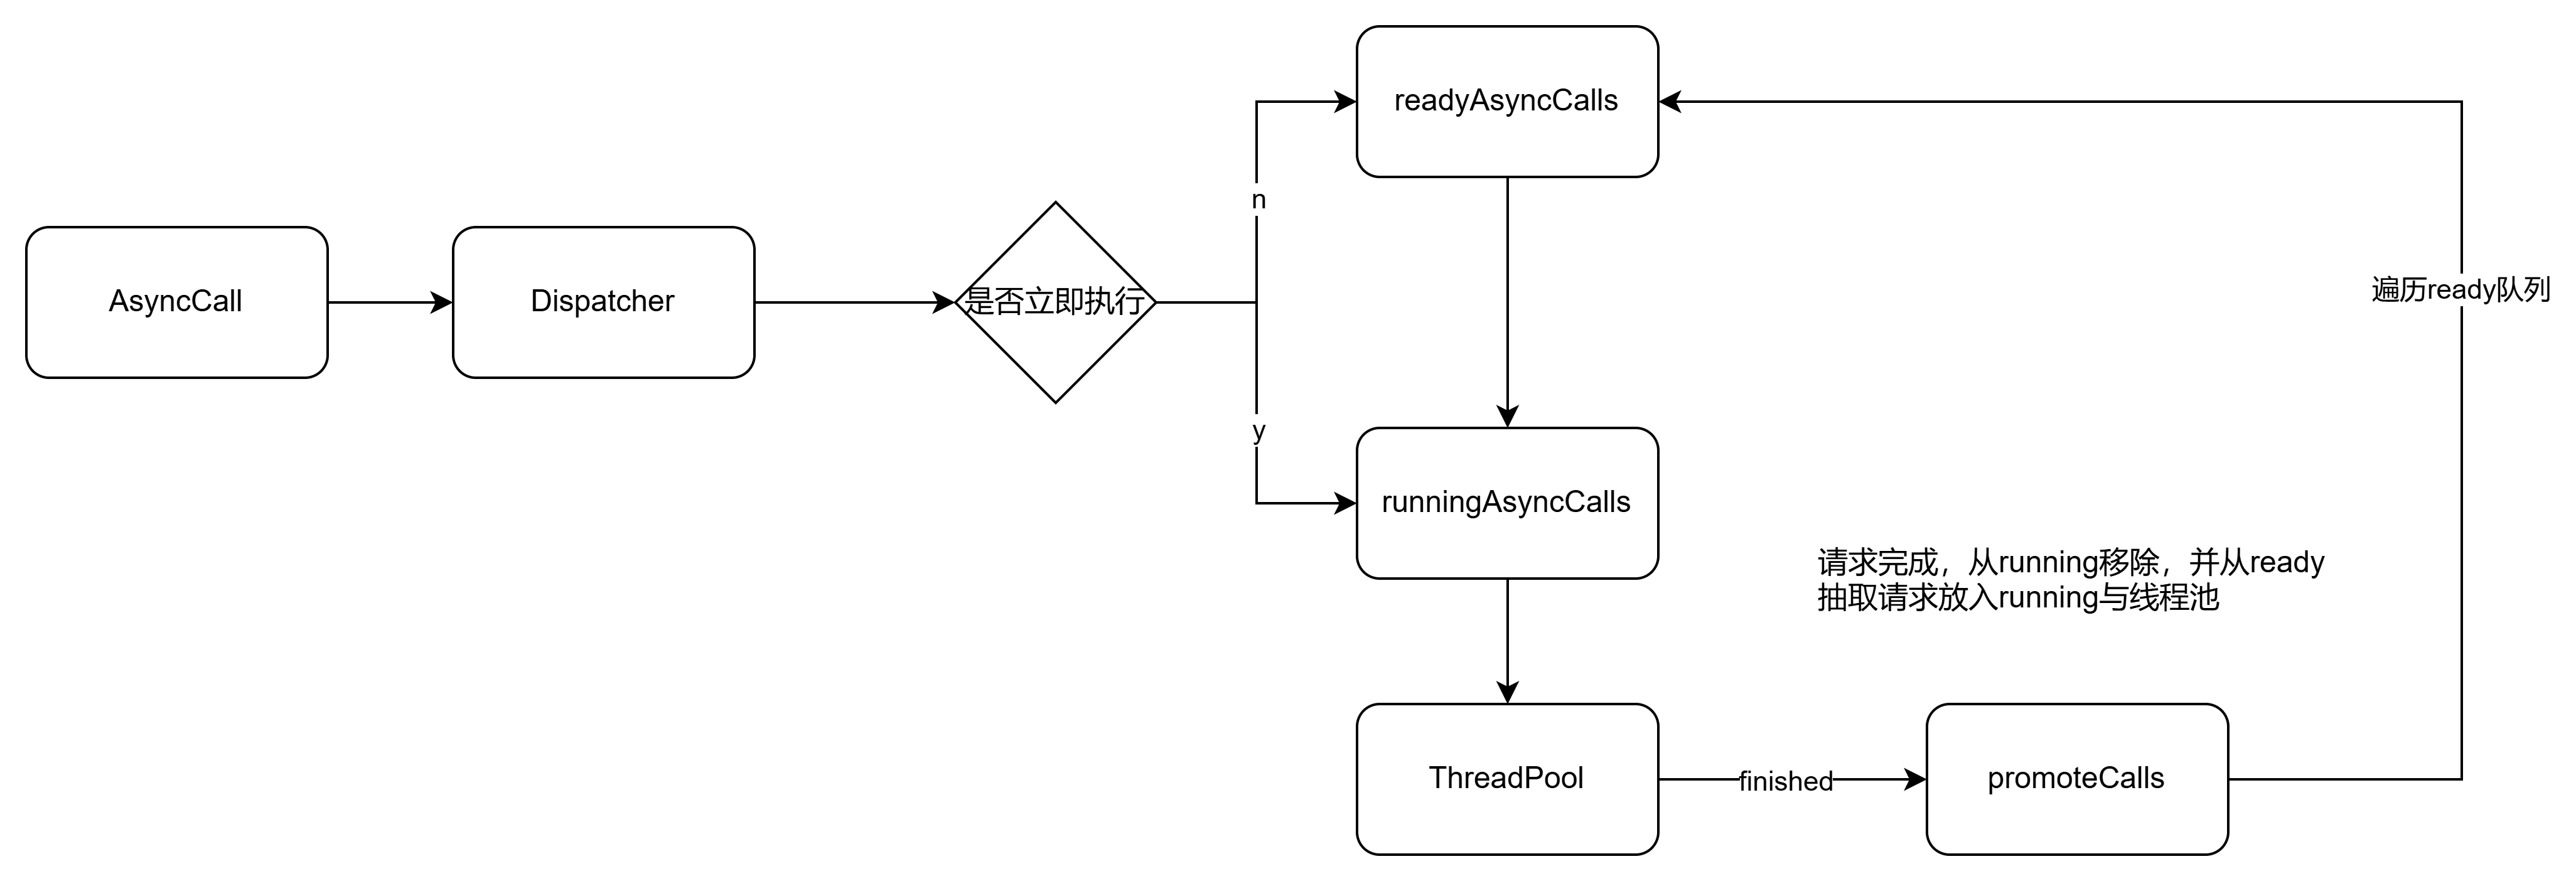
1. 如何决定将请求放入ready还是running?
1 2 3 4 5 6 7 8 9 10 11 12 13 14 15 16 synchronized void enqueue (AsyncCall call) { if (runningAsyncCalls.size() < maxRequests && runningCallsForHost(call) < maxRequestsPerHost) { runningAsyncCalls.add(call); executorService().execute(call); } else { readyAsyncCalls.add(call); } }
同时满足以下两个条件放入running立即执行,否则放入ready等待执行
- 正在执行的异步请求个数不大于64个(maxRequests)
- 同个域名的请求最大数不大于5个(maxRequestsPerHost)
2. 从Ready移动到Running的条件是什么?
1
2
3
4
5
6
7
8
9
override fun execute () ... try { } finally { client.dispatcher.finished(this ) } }
1
2
3
4
5
6
7
8
9
10
11
12
13
14
private fun <T> finished (calls: Deque <T >, call: T ) val idleCallback: Runnable? synchronized(this ) { if (!calls.remove(call)) throw AssertionError("Call wasn't in-flight!" ) idleCallback = this .idleCallback } val isRunning = promoteAndExecute() ... }
每个请求执行完成就会从running移除,进行第一步相同逻辑的判断,尝试从ready中取出一个任务放到running执行
3. 分发器线程池是怎么定义的?
RealCall.kt
1
2
3
4
5
6
7
8
override fun enqueue (responseCallback: Callback ) check(executed.compareAndSet(false , true )) { "Already Executed" } callStart() client.dispatcher.enqueue(AsyncCall(responseCallback)) }
然后调用调度器的enqueue方法,
Dispatcher.kt
1
2
3
4
5
6
7
8
9
10
11
12
13
14
15
16
17
18
19
20
21
22
23
24
25
26
27
28
29
30
31
32
33
34
35
36
37
38
39
40
41
42
43
44
45
46
47
48
49
50
51
52
53
54
internal fun enqueue (call: AsyncCall ) synchronized(this ) { readyAsyncCalls.add(call) if (!call.call.forWebSocket) { val existingCall = findExistingCallWithHost(call.host) if (existingCall != null ) call.reuseCallsPerHostFrom(existingCall) } } promoteAndExecute() } private fun promoteAndExecute () Boolean { this .assertThreadDoesntHoldLock() val executableCalls = mutableListOf<AsyncCall>() val isRunning: Boolean synchronized(this ) { val i = readyAsyncCalls.iterator() while (i.hasNext()) { val asyncCall = i.next() if (runningAsyncCalls.size >= this .maxRequests) break if (asyncCall.callsPerHost.get () >= this .maxRequestsPerHost) continue i.remove() asyncCall.callsPerHost.incrementAndGet() executableCalls.add(asyncCall) runningAsyncCalls.add(asyncCall) } isRunning = runningCallsCount() > 0 } for (i in 0 until executableCalls.size) { val asyncCall = executableCalls[i] asyncCall.executeOn(executorService) } return isRunning }
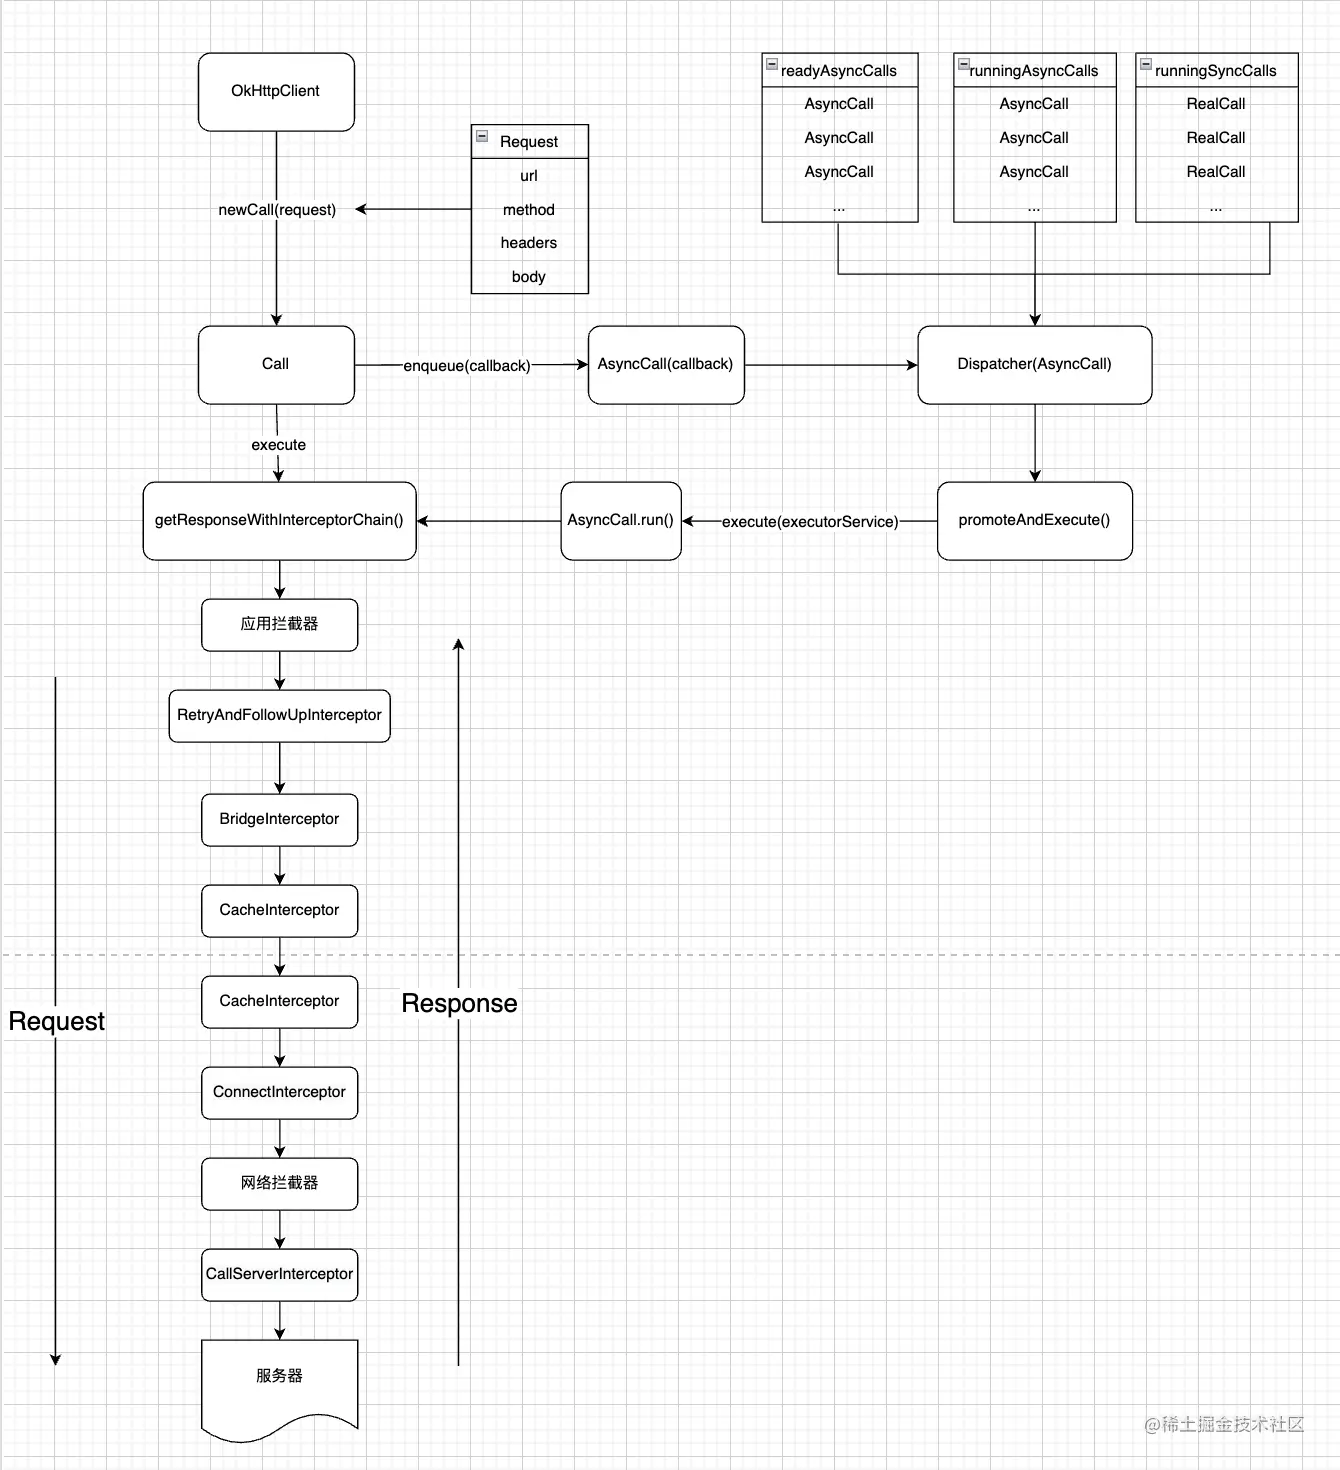
调度器的enqueue方法就是将AsyncCall加入到readyAsyncCalls队列中,然后调用promoteAndExecute方法来执行请求,promoteAndExecute方法做的其实就是遍历readyAsyncCalls队列,然后将符合条件的请求用线程池执行,也就是会执行AsyncCall.run()方法。
AsyncCall 方法简单来说就是调用getResponseWithInterceptorChain方法拿到response,然后通过Callback.onResponse方法传递出去。反之,如果请求失败,捕获了异常,就通过Callback.onFailure将异常信息传递出去。 最终,请求结束,调用调度器finish方法。
Dispatcher.kt
1 2 3 4 5 6 7 8 9 10 11 12 13 14 15 16 17 18 19 20 21 22 23 24 25 26 27 internal fun finished (call: AsyncCall ) call.callsPerHost.decrementAndGet() finished(runningAsyncCalls, call) } internal fun finished (call: RealCall ) finished(runningSyncCalls, call) } private fun <T> finished (calls: Deque <T >, call: T ) val idleCallback: Runnable? synchronized(this ) { if (!calls.remove(call)) throw AssertionError("Call wasn't in-flight!" ) idleCallback = this .idleCallback } val isRunning = promoteAndExecute() if (!isRunning && idleCallback != null ) { idleCallback.run() } }
获取Response 接着就是看看getResponseWithInterceptorChain方法是如何拿到response的。
1
2
3
4
5
6
7
8
9
10
11
12
13
14
15
16
17
18
19
20
21
22
23
24
25
26
27
28
29
30
31
32
33
34
35
36
37
38
39
40
41
42
43
44
internal fun getResponseWithInterceptorChain () val interceptors = mutableListOf<Interceptor>() interceptors += client.interceptors interceptors += RetryAndFollowUpInterceptor(client) interceptors += BridgeInterceptor(client.cookieJar) interceptors += CacheInterceptor(client.cache) interceptors += ConnectInterceptor if (!forWebSocket) { interceptors += client.networkInterceptors } interceptors += CallServerInterceptor(forWebSocket) val chain = RealInterceptorChain( call = this , interceptors = interceptors, index = 0 , exchange = null , request = originalRequest, connectTimeoutMillis = client.connectTimeoutMillis, readTimeoutMillis = client.readTimeoutMillis, writeTimeoutMillis = client.writeTimeoutMillis ) var calledNoMoreExchanges = false try { val response = chain.proceed(originalRequest) if (isCanceled()) { response.closeQuietly() throw IOException("Canceled" ) } return response } catch (e: IOException) { calledNoMoreExchanges = true throw noMoreExchanges(e) as Throwable } finally { if (!calledNoMoreExchanges) { noMoreExchanges(null ) } } }
采用了责任链设计模式 ,通过拦截器构建了以RealInterceptorChain责任链,然后执行proceed方法来得到response。
Interceptor 只声明了一个拦截器方法,在子类中具体实现,还包含一个Chain接口,核心方法是proceed(request)处理请求来获取response。
1
2
3
4
5
6
7
8
9
10
11
12
13
14
15
16
17
18
19
20
21
22
23
24
25
26
27
28
29
30
fun interface Interceptor { @Throws(IOException::class) fun intercept (chain: Chain ) interface Chain { fun request () @Throws(IOException::class) fun proceed (request: Request ) fun connection () fun call () fun connectTimeoutMillis () Int fun withConnectTimeout (timeout: Int , unit: TimeUnit ) fun readTimeoutMillis () Int fun withReadTimeout (timeout: Int , unit: TimeUnit ) fun writeTimeoutMillis () Int fun withWriteTimeout (timeout: Int , unit: TimeUnit ) } }
RealInterceptorChain 拦截器链就是实现Interceptor.Chain接口,重点就是复写的proceed方法。
1
2
3
4
5
6
7
8
9
10
11
12
13
14
15
16
17
18
19
20
21
22
23
24
25
26
27
28
29
30
31
32
33
34
35
36
37
38
39
40
41
42
43
44
45
46
47
48
49
50
51
52
class RealInterceptorChain ( internal val call: RealCall, private val interceptors: List<Interceptor>, private val index: Int , internal val exchange: Exchange?, internal val request: Request, internal val connectTimeoutMillis: Int , internal val readTimeoutMillis: Int , internal val writeTimeoutMillis: Int ) : Interceptor.Chain { ···省略代码··· private var calls: Int = 0 override fun call () override fun request () @Throws(IOException::class) override fun proceed (request: Request ) check(index < interceptors.size) calls++ if (exchange != null ) { check(exchange.finder.sameHostAndPort(request.url)) { "network interceptor ${interceptors[index - 1 ]} must retain the same host and port" } check(calls == 1 ) { "network interceptor ${interceptors[index - 1 ]} must call proceed() exactly once" } } val next = copy(index = index + 1 , request = request) val interceptor = interceptors[index] @Suppress("USELESS_ELVIS" ) val response = interceptor.intercept(next) ?: throw NullPointerException( "interceptor $interceptor returned null" ) if (exchange != null ) { check(index + 1 >= interceptors.size || next.calls == 1 ) { "network interceptor $interceptor must call proceed() exactly once" } } check(response.body != null ) { "interceptor $interceptor returned a response with no body" } return response } }
链式调用,最终会执行拦截器列表中的每个拦截器,返回Response。
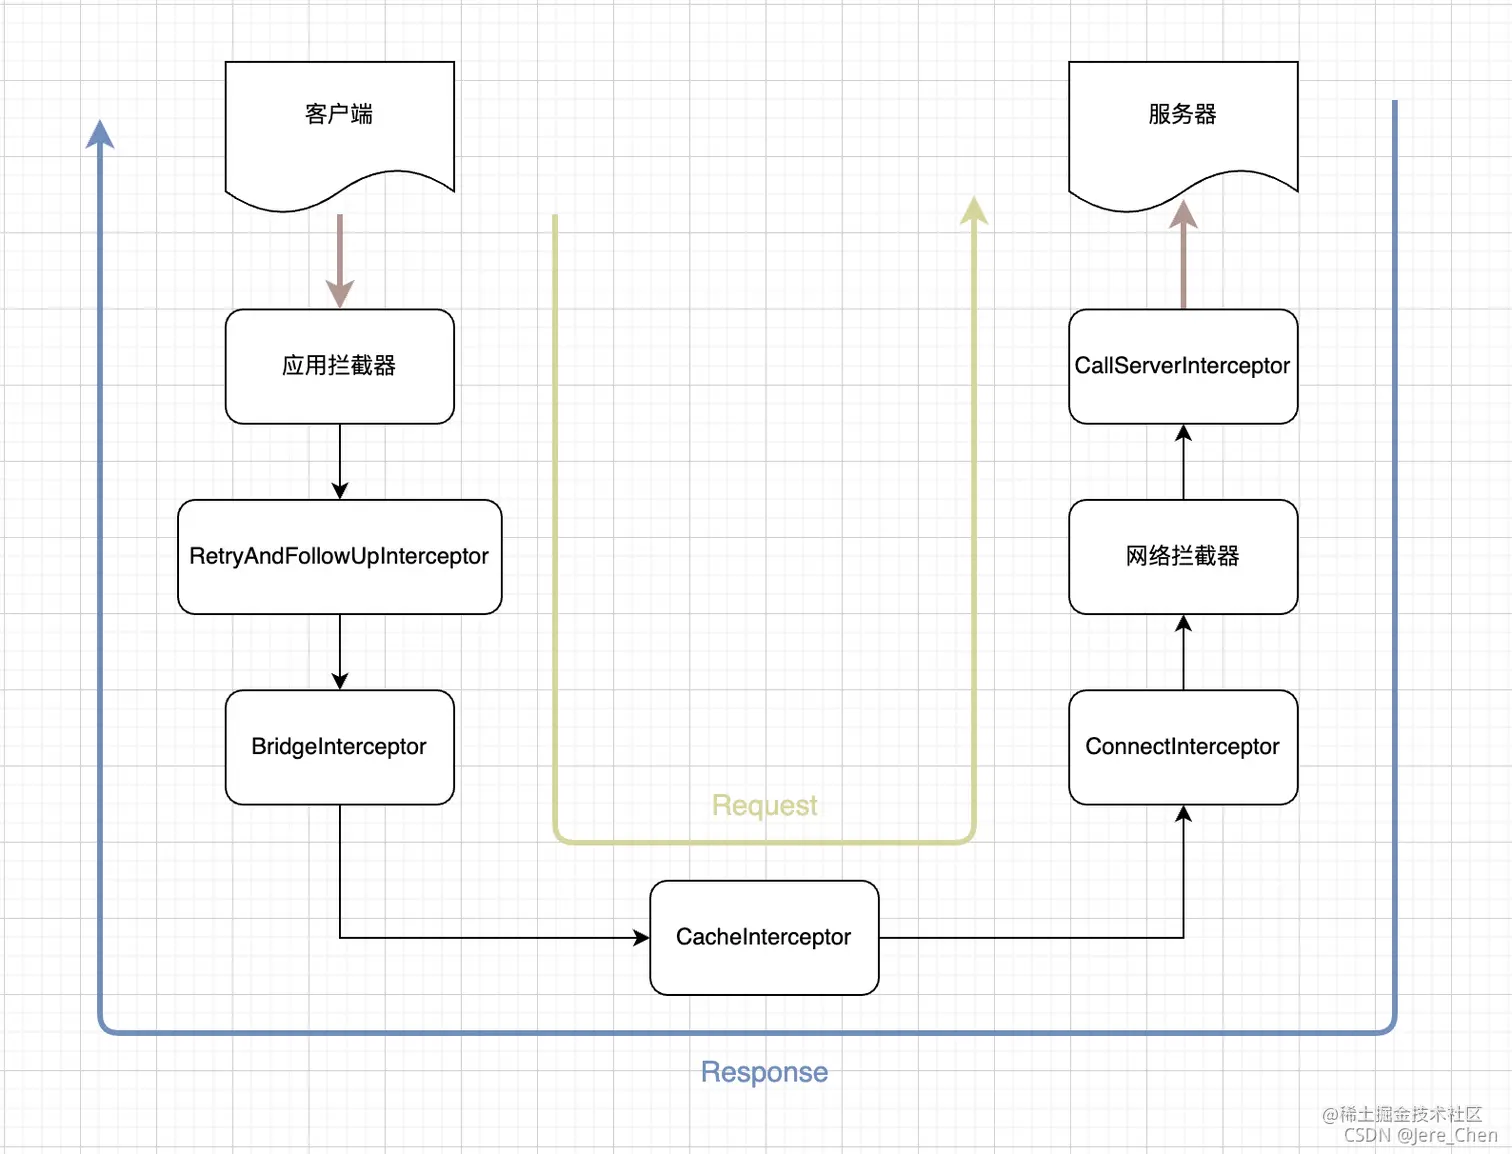
拦截器
client.interceptors:这是由开发者设置的,会在所有的拦截器处理之前进行最早 的拦截处理,可用于添加一些公共参数,如自定义header、自定义log等等。RetryAndFollowUpInterceptor:这里会对连接做一些初始化工作,以及请求失败的重试工作,重定向的后续请求工作。跟他的名字一样,就是做重试工作还有一些连接跟踪工作。BridgeInterceptor:是客户端与服务器之间的沟通桥梁,负责将用户构建的请求转换为服务器需要的请求,以及将网络请求返回回来的响应转换为用户可用的响应。CacheInterceptor:这里主要是缓存的相关处理,会根据用户在OkHttpClient里定义的缓存配置,然后结合请求新建一个缓存策略,由它来判断是使用网络还是缓存来构建response。ConnectInterceptor:这里主要就是负责建立连接,会建立TCP连接或者TLS连接。client.networkInterceptors:这里也是开发者自己设置的,所以本质上和第一个拦截器差不多,但是由于位置不同,所以用处也不同。CallServerInterceptor:这里就是进行网络数据的请求和响应了,也就是实际的网络I/O操作,将请求头与请求体发送给服务器,以及解析服务器返回的response。
client.interceptors 这是用户自己定义的拦截器,称为应用拦截器 ,会保存在OkHttpClient的interceptors: List<Interceptor>列表中。 他是拦截器责任链中的第一个拦截器 ,也就是说会第一个执行拦截方法,可以通过它来添加自定义Header信息,如:
1
2
3
4
5
6
7
8
9
10
11
12
13
14
15
16
17
18
19
class HeaderInterceptor implements Interceptor { @Override public Response intercept (Chain chain) throws IOException { Request request = chain.request().newBuilder() .addHeader("device-android" , "xxxxxxxxxxx" ) .addHeader("country-code" , "ZH" ) .build(); return chain.proceed(request); } } OkHttpClient client = new OkHttpClient .Builder() .connectTimeout(60 , TimeUnit.SECONDS) .readTimeout(15 , TimeUnit.SECONDS) .writeTimeout(15 , TimeUnit.SECONDS) .cookieJar(new MyCookieJar ()) .addInterceptor(new HeaderInterceptor ()) .build();
RetryAndFollowUpInterceptor 第二个拦截器,负责请求失败的重试工作与重定向的后续请求工作,同时它会对连接做一些初始化工作。
1
2
3
4
5
6
7
8
9
10
11
12
13
14
15
16
17
18
19
20
21
22
23
24
25
26
27
28
29
30
31
32
33
34
35
36
37
38
39
40
41
42
43
44
45
46
47
48
49
50
51
52
53
54
55
56
57
58
59
60
61
62
63
64
65
66
67
68
69
70
71
72
73
74
75
76
77
78
79
80
81
82
83
84
85
86
87
88
89
90
91
92
93
94
95
96
97
98
99
100
101
102
103
104
105
106
107
108
109
110
111
class RetryAndFollowUpInterceptor (private val client: OkHttpClient) : Interceptor { @Throws(IOException::class) override fun intercept (chain: Interceptor .Chain ) val realChain = chain as RealInterceptorChain var request = chain.request val call = realChain.call var followUpCount = 0 var priorResponse: Response? = null var newExchangeFinder = true var recoveredFailures = listOf<IOException>() while (true ) { call.enterNetworkInterceptorExchange(request, newExchangeFinder) var response: Response var closeActiveExchange = true try { if (call.isCanceled()) { throw IOException("Canceled" ) } try { response = realChain.proceed(request) newExchangeFinder = true } catch (e: RouteException) { if (!recover(e.lastConnectException, call, request, requestSendStarted = false )) { throw e.firstConnectException.withSuppressed(recoveredFailures) } else { recoveredFailures += e.firstConnectException } newExchangeFinder = false continue } catch (e: IOException) { if (!recover(e, call, request, requestSendStarted = e !is ConnectionShutdownException)) { throw e.withSuppressed(recoveredFailures) } else { recoveredFailures += e } newExchangeFinder = false continue } if (priorResponse != null ) { response = response.newBuilder() .priorResponse(priorResponse.newBuilder() .body(null ) .build()) .build() } val exchange = call.interceptorScopedExchange val followUp = followUpRequest(response, exchange) if (followUp == null ) { if (exchange != null && exchange.isDuplex) { call.timeoutEarlyExit() } closeActiveExchange = false return response } val followUpBody = followUp.body if (followUpBody != null && followUpBody.isOneShot()) { closeActiveExchange = false return response } response.body?.closeQuietly() if (++followUpCount > MAX_FOLLOW_UPS) { throw ProtocolException("Too many follow-up requests: $followUpCount " ) } request = followUp priorResponse = response } finally { call.exitNetworkInterceptorExchange(closeActiveExchange) } } } private fun recover ( e: IOException , call: RealCall , userRequest: Request , requestSendStarted: Boolean ) Boolean { if (!client.retryOnConnectionFailure) return false if (requestSendStarted && requestIsOneShot(e, userRequest)) return false if (!isRecoverable(e, requestSendStarted)) return false if (!call.retryAfterFailure()) return false return true } ···省略代码···
BridgeInterceptor 是客户端与服务器之间的沟通桥梁,负责将用户构建的请求转换为服务器需要的请求,比如:添加 Content-Type,添加 Cookie,添加User-Agent等等。再将服务器返回的response做一些处理转换为客户端需要的response。比如:移除响应头中的Content-Encoding、Content-Length等等。
1
2
3
4
5
6
7
8
9
10
11
12
13
14
15
16
17
18
19
20
21
22
23
24
25
26
27
28
29
30
31
32
33
34
35
36
37
38
39
40
41
42
43
44
45
46
47
48
49
50
51
52
53
54
55
56
57
58
class BridgeInterceptor (private val cookieJar: CookieJar) : Interceptor { @Throws(IOException::class) override fun intercept (chain: Interceptor .Chain ) val userRequest = chain.request() val requestBuilder = userRequest.newBuilder() val body = userRequest.body val contentType = body.contentType() requestBuilder.header("Content-Type" , contentType.toString()) requestBuilder.header("Content-Length" , contentLength.toString()) requestBuilder.header("Transfer-Encoding" , "chunked" ) requestBuilder.header("Host" , userRequest.url.toHostHeader()) requestBuilder.header("Connection" , "Keep-Alive" ) ···省略代码··· val cookies = cookieJar.loadForRequest(userRequest.url) if (cookies.isNotEmpty()) { requestBuilder.header("Cookie" , cookieHeader(cookies)) } if (userRequest.header("User-Agent" ) == null ) { requestBuilder.header("User-Agent" , userAgent) } val networkResponse = chain.proceed(requestBuilder.build()) cookieJar.receiveHeaders(userRequest.url, networkResponse.headers) val responseBuilder = networkResponse.newBuilder() .request(userRequest) if (transparentGzip && "gzip" .equals(networkResponse.header("Content-Encoding" ), ignoreCase = true ) && networkResponse.promisesBody()) { val responseBody = networkResponse.body if (responseBody != null ) { val gzipSource = GzipSource(responseBody.source()) val strippedHeaders = networkResponse.headers.newBuilder() .removeAll("Content-Encoding" ) .removeAll("Content-Length" ) .build() responseBuilder.headers(strippedHeaders) val contentType = networkResponse.header("Content-Type" ) responseBuilder.body(RealResponseBody(contentType, -1L , gzipSource.buffer())) } } return responseBuilder.build() ···省略代码···
CacheInterceptor 用户可以通过OkHttpClient.cache来配置缓存,缓存拦截器通过CacheStrategy来判断是使用网络还是缓存来构建response。
1
2
3
4
5
6
7
8
9
10
11
12
13
14
15
16
17
18
19
20
21
22
23
24
25
26
27
28
29
30
31
32
33
34
35
36
37
38
39
40
41
42
43
44
45
46
47
48
49
50
51
52
53
54
55
56
57
58
59
60
61
62
63
64
65
66
67
68
69
70
71
72
73
74
75
76
77
78
79
80
81
82
83
84
85
86
87
88
89
90
91
92
93
94
95
96
97
98
99
100
101
102
103
104
105
106
107
108
109
110
111
112
113
114
115
116
117
118
119
120
121
122
123
124
class CacheInterceptor (internal val cache: Cache?) : Interceptor { @Throws(IOException::class) override fun intercept (chain: Interceptor .Chain ) val call = chain.call() val cacheCandidate = cache?.get (chain.request()) val now = System.currentTimeMillis() val strategy = CacheStrategy.Factory(now, chain.request(), cacheCandidate).compute() val networkRequest = strategy.networkRequest val cacheResponse = strategy.cacheResponse cache?.trackResponse(strategy) val listener = (call as ? RealCall)?.eventListener ?: EventListener.NONE if (cacheCandidate != null && cacheResponse == null ) { cacheCandidate.body?.closeQuietly() } if (networkRequest == null && cacheResponse == null ) { return Response.Builder() .request(chain.request()) .protocol(Protocol.HTTP_1_1) .code(HTTP_GATEWAY_TIMEOUT) .message("Unsatisfiable Request (only-if-cached)" ) .body(EMPTY_RESPONSE) .sentRequestAtMillis(-1L ) .receivedResponseAtMillis(System.currentTimeMillis()) .build().also { listener.satisfactionFailure(call, it) } } if (networkRequest == null ) { return cacheResponse!!.newBuilder() .cacheResponse(stripBody(cacheResponse)) .build().also { listener.cacheHit(call, it) } } if (cacheResponse != null ) { listener.cacheConditionalHit(call, cacheResponse) } else if (cache != null ) { listener.cacheMiss(call) } var networkResponse: Response? = null try { networkResponse = chain.proceed(networkRequest) } finally { if (networkResponse == null && cacheCandidate != null ) { cacheCandidate.body?.closeQuietly() } } if (cacheResponse != null ) { if (networkResponse?.code == HTTP_NOT_MODIFIED) { val response = cacheResponse.newBuilder() .headers(combine(cacheResponse.headers, networkResponse.headers)) .sentRequestAtMillis(networkResponse.sentRequestAtMillis) .receivedResponseAtMillis(networkResponse.receivedResponseAtMillis) .cacheResponse(stripBody(cacheResponse)) .networkResponse(stripBody(networkResponse)) .build() networkResponse.body!!.close() cache!!.trackConditionalCacheHit() cache.update(cacheResponse, response) return response.also { listener.cacheHit(call, it) } } else { cacheResponse.body?.closeQuietly() } } val response = networkResponse!!.newBuilder() .cacheResponse(stripBody(cacheResponse)) .networkResponse(stripBody(networkResponse)) .build() if (cache != null ) { if (response.promisesBody() && CacheStrategy.isCacheable(response, networkRequest)) { val cacheRequest = cache.put(response) return cacheWritingResponse(cacheRequest, response).also { if (cacheResponse != null ) { listener.cacheMiss(call) } } } if (HttpMethod.invalidatesCache(networkRequest.method)) { try { cache.remove(networkRequest) } catch (_: IOException) { } } } return response } ···省略代码···
如果从缓存获取的 Response 是nul,那就需要使用网络请求获取响应
如果是Https请求,但是又丢失了握手信息,那也不能使用缓存,需要进行网络请求
如果判断响应码不能缓存且响应头有 no-store 标识,那就需要进行网络请求
如果请求头有 no-cache 标识或者有 If-Modified-since/If-None-Match,那么需要进行网络请求
如果响应头没有 no-cache 标识,且缓存时间没有超过极限时间,那么可以使用缓存,不需要进行网络请求
如果缓存过期了,判断响应头是否设置 Etag/Last-Modified/Date,没有那就直接使用网络请求否则需要考虑服务器返回304;
并且,只要需要进行网络请求,请求头中就不能包含only-if-cached,否则框架直接返回504
ConnectInterceptor 负责实现与服务器真正建立起连接
1
2
3
4
5
6
7
8
9
10
11
12
kotlin 代码解读复制代码object ConnectInterceptor : Interceptor { @Throws(IOException::class) override fun intercept (chain: Interceptor .Chain ) val realChain = chain as RealInterceptorChain val exchange = realChain.call.initExchange(chain) val connectedChain = realChain.copy(exchange = exchange) return connectedChain.proceed(realChain.request) } }
初始化一个exchange对象。
然后根据这个exchange对象来复制创建一个新的连接责任链。
执行该连接责任链。
RealCall.kt
1
2
3
4
5
6
7
8
9
10
11
internal fun initExchange (chain: RealInterceptorChain ) ...省略代码... val exchangeFinder = this .exchangeFinder!! val codec = exchangeFinder.find(client, chain) val result = Exchange(this , eventListener, exchangeFinder, codec) ...省略代码... return result }
ExchangeFinder.kt
1
2
3
4
5
6
7
8
9
10
11
12
13
14
15
16
17
18
19
20
21
22
23
24
fun find ( client: OkHttpClient , chain: RealInterceptorChain ) try { val resultConnection = findHealthyConnection( connectTimeout = chain.connectTimeoutMillis, readTimeout = chain.readTimeoutMillis, writeTimeout = chain.writeTimeoutMillis, pingIntervalMillis = client.pingIntervalMillis, connectionRetryEnabled = client.retryOnConnectionFailure, doExtensiveHealthChecks = chain.request.method != "GET" ) return resultConnection.newCodec(client, chain) } catch (e: RouteException) { trackFailure(e.lastConnectException) throw e } catch (e: IOException) { trackFailure(e) throw RouteException(e) } }
ExchangeFinder.kt
1
2
3
4
5
6
7
8
9
10
11
12
13
14
15
16
17
18
19
20
21
22
23
24
25
26
private fun findHealthyConnection ( connectTimeout: Int , readTimeout: Int , writeTimeout: Int , pingIntervalMillis: Int , connectionRetryEnabled: Boolean , doExtensiveHealthChecks: Boolean ) while (true ) { val candidate = findConnection( connectTimeout = connectTimeout, readTimeout = readTimeout, writeTimeout = writeTimeout, pingIntervalMillis = pingIntervalMillis, connectionRetryEnabled = connectionRetryEnabled ) if (candidate.isHealthy(doExtensiveHealthChecks)) { return candidate } candidate.noNewExchanges() ...省略代码... } }
通过findConnection方法来查找连接,找到连接后判断是否是合格可用的,合格就直接返回该连接。
所以核心方法就是findConnection
1
2
3
4
5
6
7
8
9
10
11
12
13
14
15
16
17
18
19
20
21
22
23
24
25
26
27
28
29
30
31
32
33
34
35
36
37
38
39
40
41
42
43
44
45
46
47
48
49
50
51
52
53
54
55
56
57
58
59
60
61
62
63
64
65
66
67
68
69
70
71
72
73
74
75
76
77
78
79
80
81
82
83
84
85
86
87
88
89
90
91
92
93
94
95
private fun findConnection ( connectTimeout: Int , readTimeout: Int , writeTimeout: Int , pingIntervalMillis: Int , connectionRetryEnabled: Boolean ) if (call.isCanceled()) throw IOException("Canceled" ) val callConnection = call.connection if (callConnection != null ) { var toClose: Socket? = null synchronized(callConnection) { if (callConnection.noNewExchanges || !sameHostAndPort(callConnection.route().address.url)) { toClose = call.releaseConnectionNoEvents() } } if (call.connection != null ) { check(toClose == null ) return callConnection } toClose?.closeQuietly() eventListener.connectionReleased(call, callConnection) } refusedStreamCount = 0 connectionShutdownCount = 0 otherFailureCount = 0 if (connectionPool.callAcquirePooledConnection(address, call, null , false )) { val result = call.connection!! eventListener.connectionAcquired(call, result) return result } val routes: List<Route>? val route: Route ...省略代码... if (connectionPool.callAcquirePooledConnection(address, call, routes, false )) { val result = call.connection!! eventListener.connectionAcquired(call, result) return result } route = localRouteSelection.next() } val newConnection = RealConnection(connectionPool, route)call.connectionToCancel = newConnection try { newConnection.connect( connectTimeout, readTimeout, writeTimeout, pingIntervalMillis, connectionRetryEnabled, call, eventListener ) } finally { call.connectionToCancel = null } call.client.routeDatabase.connected(newConnection.route()) if (connectionPool.callAcquirePooledConnection(address, call, routes, true )) { val result = call.connection!! nextRouteToTry = route newConnection.socket().closeQuietly() eventListener.connectionAcquired(call, result) return result } synchronized(newConnection) { connectionPool.put(newConnection) call.acquireConnectionNoEvents(newConnection) } eventListener.connectionAcquired(call, newConnection) return newConnection}
一共做了5次尝试去得到连接:
第一次,尝试重连 call 中的 connection,不需要去重新获取连接。
第二次,尝试从连接池中获取一个连接,不带路由,不带多路复用。
第三次,再次尝试从连接池中获取一个连接,带路由,不带多路复用。
第四次,手动创建一个新连接。
第五次,再次尝试从连接池中获取一个连接,带路由,带多路复用。
client.networkInterceptors 该拦截器称为网络拦截器 ,与client.interceptors一样也是由用户自己定义的,同样是以列表的形式存在OkHttpClient中。
他们的不同都是由于他们所处的位置不同所导致的,应用拦截器处于第一个位置,所以无论如何它都会被执行,而且只会执行一次 。而网络拦截器处于倒数第二的位置,它不一定会被执行,而且可能会被执行多次 ,比如:在RetryAndFollowUpInterceptor失败或者CacheInterceptor直接返回缓存的情况下,网络拦截器是不会被执行的。
CallServerInterceptor 到了这里,客户端与服务器已经建立好了连接,接着就是将请求头与请求体发送给服务器,以及解析服务器返回的response了。
1
2
3
4
5
6
7
8
9
10
11
12
13
14
15
16
17
18
19
20
21
22
23
24
25
26
27
28
29
30
31
32
33
34
35
36
37
38
39
40
41
42
43
44
45
46
47
48
49
50
51
52
53
54
55
56
57
58
59
60
61
class CallServerInterceptor (private val forWebSocket: Boolean ) : Interceptor { @Throws(IOException::class) override fun intercept (chain: Interceptor .Chain ) val realChain = chain as RealInterceptorChain val exchange = realChain.exchange!! val request = realChain.request val requestBody = request.body var invokeStartEvent = true var responseBuilder: Response.Builder? = null try { exchange.writeRequestHeaders(request) if (HttpMethod.permitsRequestBody(request.method) && requestBody != null ) { if ("100-continue" .equals(request.header("Expect" ), ignoreCase = true )) { exchange.flushRequest() responseBuilder = exchange.readResponseHeaders(expectContinue = true ) exchange.responseHeadersStart() invokeStartEvent = false } if (responseBuilder == null ) { if (requestBody.isDuplex()) { exchange.flushRequest() val bufferedRequestBody = exchange.createRequestBody(request, true ).buffer() requestBody.writeTo(bufferedRequestBody) } else { val bufferedRequestBody = exchange.createRequestBody(request, false ).buffer() requestBody.writeTo(bufferedRequestBody) bufferedRequestBody.close() } ···省略代码··· exchange.finishRequest() ···省略代码··· try { if (responseBuilder == null ) { responseBuilder = exchange.readResponseHeaders(expectContinue = false )!! ···省略代码··· var response = responseBuilder .request(request) .handshake(exchange.connection.handshake()) .sentRequestAtMillis(sentRequestMillis) .receivedResponseAtMillis(System.currentTimeMillis()) .build() var code = response.code ···省略代码··· return response ···省略代码···
写入发送请求头,然后根据条件是否写入发送请求体,请求结束。解析服务器返回的请求头,然后构建一个新的response,并返回。 这里CallServerInterceptor是拦截器责任链中最后一个拦截器了,所以他不会再调用chain.proceed()方法往下执行,而是将这个构建的response往上传递给责任链中的每个拦截器。
总结
**addInterceptor(Interceptor)**,处理原始请求和最终的响应:可以添加自定义header、通用参数、参数加密、网关接入。由开发者设置的,会按照开发者的要求,在所有的拦截器处理之前进行最早的拦截处理,比如一些公共参数,Header都可以在这里添加。
RetryAndFollowUpInterceptor ,处理错误重试和重定向,这里会对连接做一些初始化工作,以及请求失败的充实工作,重定向的后续请求工作。跟他的名字一样,就是做重试工作还有一些连接跟踪工作。BridgeInterceptor ,应用层和网络层的桥接拦截器,主要工作是为请求添加cookie、添加固定的header,比如Host、Content-Length、Content-Type、User-Agent等等,然后保存响应结果的cookie,如果响应使用gzip压缩过,则还需要进行解压。为用户构建一个能够进行网络访问的请求,同时后续工作将网络请求回来的响应Response转化为用户可用的Response。CacheInterceptor ,这里主要是处理cache相关处理,会根据OkHttpClient对象的配置以及缓存策略对请求值进行缓存,而且如果本地有了可⽤的Cache,就可以在没有网络交互的情况下就返回缓存结果。如果命中缓存则不会发起网络请求 ConnectInterceptor ,连接拦截器,内部会维护一个连接池,负责连接复用、创建连接(三次握手等等)、释放连接以及创建连接上的socket流。建立TCP连接或者TLS连接,以及负责编码解码的HttpCodecnetworkInterceptors ,开发者自己设置的,所以本质上和第一个拦截器差不多,但是由于位置不同,所以用处也不同。这个位置添加的拦截器可以看到请求和响应的数据了,所以可以做一些网络调试。CallServerInterceptor ,这里就是进行网络数据的请求和响应了,也就是实际的网络I/O操作,通过socket读写数据。
完整流程图
反思 设计模式
建造者模式 :不论是在OkHttpClient、Request还是Response中都用到了建造者模式,因为这几个类中都有很多参数,需要供用户选择需要的参数来构建其想要的实例工厂方法模式 :帮助生成复杂对象,如: OkHttpClient.newCall(request Request) 来创建 Call 对象。责任链模式 :将7个拦截器构成拦截器责任链,然后按顺序从上往下执行,得到Response后,从下往上传回去。
对象行为型模式,为请求创建了一个接收者对象的链,在处理请求的时候执行过滤(各司其职)。
任链上的处理者负责处理请求,客户只需要将请求发送到责任链即可,无须关心请求的处理细节和请求的传递,所以职责链将请求的发送者和请求的处理者解耦了。
线程安全 在 AsyncCall 类中的 callsPerHost 变量,使用了 Volatile + AtomicInteger来修饰,从而保证在多线程下的线程安全。
1
2
3
4
5
6
inner class AsyncCall ( private val responseCallback: Callback) : Runnable { @Volatile var callsPerHost = AtomicInteger(0 ) private set ...省略代码... }
数据结构 为什么readyAsyncCalls runningAsyncCalls runningSyncCalls采用ArrayDeque
他们都是用来存放网络请求的,这些请求需要做到先到先得,所以采用队列。
根据代码所示,当执行enqueue时,我们需要遍历readyAsyncCalls,将符合执行条件的Call加入到runningAsyncCalls,这相对比于链表来说,数组的查找效率要更高,所以采用ArrayDeque。
ArrayBlockQueque 1 2 3 4 5 6 7 8 9 10 11 12 13 14 15 16 17 18 19 20 21 22 ArrayBlofkingQueue<Runnable> queue = new ArrayBlockingQueue <>(1 ); ThreadPoolExecutor poolExecutor = new ThreadPoolExecutor ( 0 , Integer.MAX_VALUE, keepAliveTime:60 ,TimeUnit.SEcONDs,queue ); poolExecutor.execute(() → { System.out.println("任务1:" + Thread.currentThread()); while (true ) {} }); poolExecutor.execute(() → { System.out.println("任务2:" + Thread.currentThread()); }); poolExecutor.execute(() → { System.out.println("任务2:" + Thread.currentThread()); });
执行结果为
1 2 3 任务1:Thread[pool-1-thread-1,5,main] 任务3:Thread[pool-1-thread-2,5,main] 任务2:Thread[pool-1-thread-2,5,main]
任务1立即执行且不会结束(死循环)
任务2加到等待队列中(queue)
任务3加到等待队列中,但由于队列数为1从而添加失败
当前执行的任务数小于Integer.MAX_VALUE,新开一个线程执行
任务3执行结束后从等待队列中取到任务2并执行
如果只有任务1和任务2那么只会打印“任务1”。因为任务1立即执行且不会结束,任务2加入了等待队列但永远不会被取出
LinkedBlockingQueue同理
怎么实现连接池 一些概念:
Connection,实现为RealConnection:连接,抽象概念,内部维护了SocketConnectionPool,持有RealConnectionPool:连接池,管理连接的复用Exchange:交换器(管理请求和响应、持有ExchangeCodec)ExchangeCodec:编解码器,用于编码请求,解码响应,实现有Http1ExchangeCodec和Http2ExchangeCodecHTTP 1.1:引入keep-alive机制,支持连接保活,可以多个请求复用一个连接,但请求是串行的HTTP 2.0:支持多路复用,一个连接的多个请求可以并行
为什么需要连接池? 频繁的进行建立Sokcet连接和断开Socket是非常消耗网络资源和浪费时间的,所以HTTP中的keepalive连接对于降低延迟和提升速度有非常重要的作用。keepalive机制可以在一次TCP连接中可以持续发送多份数据而不会断开连接。所以连接的多次使用,也就是复用就变得格外重要了,而复用连接就需要对连接进行管理,于是就有了连接池的概念。
中使用ConectionPool实现连接池,默认支持5个并发KeepAlive,默认链路生命为5分钟。
怎么实现的?
ConectionPool中维护了一个双端队列Deque,也就是两端都可以进出的队列,用来存储连接。
在ConnectInterceptor,也就是负责建立连接的拦截器中,首先会找可用连接,也就是从连接池中去获取连接,具体的就是会调用到ConectionPool的get方法。
1 2 3 4 5 6 7 8 9 10 RealConnection get (Address address, StreamAllocation streamAllocation, Route route) { assert (Thread.holdsLock(this )); for (RealConnection connection : connections) { if (connection.isEligible(address, route)) { streamAllocation.acquire(connection, true ); return connection; } } return null ; }
遍历了双端队列,如果连接有效,就会调用acquire方法计数并返回这个连接。
如果没找到可用连接,就会创建新连接,并会把这个建立的连接加入到双端队列中,同时开始运行线程池中的线程,其实就是调用了ConectionPool的put方法。
1 2 3 4 5 6 7 8 9 10 public final class ConnectionPool { void put (RealConnection connection) { if (!cleanupRunning) { cleanupRunning = true ; executor.execute(cleanupRunnable); } connections.add(connection); } }
这个线程池中只有一个线程,是用来清理连接的,也就是上述的cleanupRunnable
1 2 3 4 5 6 7 8 9 10 11 12 13 14 15 16 17 18 19 20 21 22 private final Runnable cleanupRunnable = new Runnable () { @Override public void run () { while (true ) { long waitNanos = cleanup(System.nanoTime()); if (waitNanos == -1 ) return ; if (waitNanos > 0 ) { long waitMillis = waitNanos / 1000000L ; waitNanos -= (waitMillis * 1000000L ); synchronized (ConnectionPool.this ) { try { ConnectionPool.this .wait(waitMillis, (int ) waitNanos); } catch (InterruptedException ignored) { } } } } } };
这个runnable会不停的调用cleanup方法清理线程池,并返回下一次清理的时间间隔,然后进入wait等待。
1 2 3 4 5 6 7 8 9 10 11 12 13 14 15 16 17 18 19 20 21 22 23 24 25 26 27 28 29 30 31 32 33 34 35 36 37 38 39 40 41 42 43 44 45 46 47 long cleanup (long now) { synchronized (this ) { for (Iterator<RealConnection> i = connections.iterator(); i.hasNext(); ) { RealConnection connection = i.next(); if (pruneAndGetAllocationCount(connection, now) > 0 ) { inUseConnectionCount++; continue ; } idleConnectionCount++; long idleDurationNs = now - connection.idleAtNanos; if (idleDurationNs > longestIdleDurationNs) { longestIdleDurationNs = idleDurationNs; longestIdleConnection = connection; } } if (longestIdleDurationNs >= this .keepAliveDurationNs || idleConnectionCount > this .maxIdleConnections) { connections.remove(longestIdleConnection); } else if (idleConnectionCount > 0 ) { return keepAliveDurationNs - longestIdleDurationNs; } else if (inUseConnectionCount > 0 ) { return keepAliveDurationNs; } else { cleanupRunning = false ; return -1 ; } } closeQuietly(longestIdleConnection.socket()); return 0 ; }
也就是当如果空闲连接maxIdleConnections超过5个或者keepalive时间大于5分钟,则将该连接清理掉。
怎样属于空闲连接? acquire计数方法:
1 2 3 4 5 6 7 8 public void acquire (RealConnection connection, boolean reportedAcquired) { assert (Thread.holdsLock(connectionPool)); if (this .connection != null ) throw new IllegalStateException (); this .connection = connection; this .reportedAcquired = reportedAcquired; connection.allocations.add(new StreamAllocationReference (this , callStackTrace)); }
在RealConnection中,有一个StreamAllocation虚引用列表allocations。每创建一个连接,就会把连接对应的StreamAllocationReference添加进该列表中,如果连接关闭以后就将该对象移除。
主要就是管理双端队列Deque<RealConnection>,可以用的连接就直接用,然后定期清理连接,同时通过对StreamAllocation的引用计数实现自动回收。
缓存 缓存的实现是基于请求和响应的header来做的。CacheStrategy即缓存策略,CacheInterceptor拦截器会根据他拿到网络请求networkRequest、缓存响应cacheResponse,从而决定是使用网络还是缓存。
CacheStrategy.java CacheStrategy
1 2 3 4 5 6 7 8 9 10 11 12 13 14 15 16 17 18 19 20 21 22 23 24 25 26 27 28 29 30 31 32 33 34 35 36 37 38 static class Factory { Factory(long nowMillis, Request request, Response cacheResponse) { this .nowMillis = nowMillis; this .request = request; this .cacheResponse = cacheResponse; if (cacheResponse != null ) { this .sentRequestMillis = cacheResponse.sentRequestAtMillis(); Headers headers = cacheResponse.headers(); for (int i = 0 , size = headers.size(); i < size; i++) { String fieldName = headers.name(i); String value = headers.value(i); if ("Date" .equalsIgnoreCase(fieldName)) { servedDate = HttpDate.parse(value); servedDateString = value; } else if (xxx){ } } } } CacheStrategy get () { CacheStrategy candidate = getCandidate(); if (candidate.networkRequest != null && request.cacheControl().onlyIfCached()) { return new CacheStrategy (null , null ); } return candidate; } CacheStrategy getCandidate () { return new CacheStrategy (xxx); } }
getCandidate里面就是根据header字段得到各种策略,然后交给拦截器处理
那么缓存是如何写入磁盘的呢?跟进InternalCache接口,他的实现在Cache类里,
Cache.java
1 2 3 4 5 6 7 8 9 10 11 12 13 14 15 16 17 18 19 20 21 22 23 24 25 26 27 28 29 30 31 32 33 34 35 36 37 38 39 InternalCache internalCache = new InternalCache () { @Override public Response get (Request request) throws IOException { return Cache.this .get(request); } @Override public CacheRequest put (Response response) throws IOException { return Cache.this .put(response); } Response get (Request request) { String key = key(request.url()); DiskLruCache.Snapshot snapshot; Entry entry; snapshot = cache.get(key); if (snapshot == null ) { return null ; } entry = new Entry (snapshot.getSource(ENTRY_METADATA)); Response response = entry.response(snapshot); return response; } CacheRequest put (Response response) { String requestMethod = response.request().method(); if (!requestMethod.equals("GET" )) { return null ; } Entry entry = new Entry (response); DiskLruCache.Editor editor = null ; editor = cache.edit(key(response.request().url())); entry.writeTo(editor); return new CacheRequestImpl (editor); } }
缓存默认是关闭的,需要自行开启:
1
2
3
4
5
new OkHttpClient .Builder().cache(new Cache ( new File (MyApp.APP.getCacheDir(), "okhttp_cache" ), 50L * 1024L * 1024L ) ).build();
线程池 当一个任务通过execute(Runnable)方法添加到线程池时: